Review - test methodology
For the test, I employed one of my backup bodies,a Canon 10D. This camera has seen a fair amount of use and its sensor had not been cleaned recently. I followed the Sensorklear's instructions precisely including: 2) Hold the camera opening down away from the user at a 15-30 degree angle. 3) Use a large rocket blower to thoroughly blow loose dust off the sensor... 5) Insert the tip of the sensor klear into the chamber and place it in the center of the sensor... rub the tip of the Sensorklear back and forth on the sensor. Work from the center to the edges and then finish up by going around the edges. 6) Repeat step 3.
Of note, the Sensorklear folks remark in step 7, "if you have one or two stubborn dust spots that resist your best efforts, it is most likely because you have neglected cleaning your sensor for too long... Use approved wet cleaning method or send to manufacturer for cleaning.
They also provide a disclaimer, stating that "SensorKlear is a highly recommended tool for cleaning CCD sensors, but... assumes no responsibility for any damage to the sensor during the cleaning process.
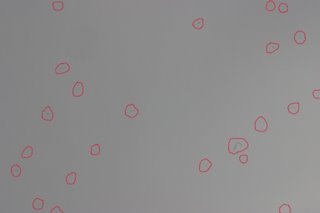
Methodology: Using a Canon 10D with a fully charged battery, and clean "L" lens, I first took a RAW photo of the rather bleak appearing skies af f/22. The RAW image was processed in PS and evaluated at 100% for the appearance of any spots suggestive of sensor dust. These "spots" were identified and appear circled in the photograph below. Of note, these photos have been stored as .jpgs and as such may contain some additional artifacts. Please click on any photo for a larger version.
23 spots including what appeared to be a small fiber were identified before cleaning.
Of note, the Sensorklear folks remark in step 7, "if you have one or two stubborn dust spots that resist your best efforts, it is most likely because you have neglected cleaning your sensor for too long... Use approved wet cleaning method or send to manufacturer for cleaning.
They also provide a disclaimer, stating that "SensorKlear is a highly recommended tool for cleaning CCD sensors, but... assumes no responsibility for any damage to the sensor during the cleaning process.
Methodology: Using a Canon 10D with a fully charged battery, and clean "L" lens, I first took a RAW photo of the rather bleak appearing skies af f/22. The RAW image was processed in PS and evaluated at 100% for the appearance of any spots suggestive of sensor dust. These "spots" were identified and appear circled in the photograph below. Of note, these photos have been stored as .jpgs and as such may contain some additional artifacts. Please click on any photo for a larger version.
23 spots including what appeared to be a small fiber were identified before cleaning.

posted by Sensorman at 4:17 PM
![]()

0 Comments:
Post a Comment
<< Home